As I mentioned in yesterday's post, the only class I took at STITCHES South 2016 was "Reversible Entrelac" with Gwen Bortner. It was an advanced class and on Sunday morning. I was a little concerned the class might not make, but we had exactly four people. Whew!
Some of you may be wondering why I would take this class. After all, I've already posted the Sir Thomas scarf, which is a reversible entrelac project. But Gwen's approach is different from Jay Petersen's. Always good to survey the range of technique.
You'll recall in entrelac you are joining little blocks as you go. These blocks join in two places. When you start a new block, you work up stitches off the side of a block in the previous tier. That is one place to think about reversibility. As you work back and forth on the new block, you also join one selvedge edge to live stitches from a block in the previous tier. That's the second place to think about reversibility.
You'll recall from my previous posts that Jay Petersen's method primarily involves thinking about the selvedge edge joins. Jay has done a lot of experimenting with knit, purl, and cable patterns. When he creates new stitches from the selvedge of the previous tier, he thinks about whether knit stitches or purl stitches will blend, and he uses the turning loops as if they were live stitches. When he joins the selvedge of his new block to the live stitches of the previous tier, he does so using Rick Mondragon's intarsia sliding loop technique. But again, that technique mimics knit or purl stitches. So Jay again thinks about which ones will blend.
This comes back to the question, what kind of reversibility? Jay has focused on the kind of reversibility found in knit-purl patterns, such as seed stitch. If there is a knit on the "front," there is a purl on the "back." Depending on the symmetry, these patterns can look essentially identical from either side (the pattern is merely shifted or mirrored), or they can be different but related. (The pentagonal entrelac cushion cover is an example of this type of reversibility.) This is similar to the reversibility of basic two-color double-knitting. The sides are positive-negative mirrors of each other. If there are equal numbers of knits and purls, and especially if the arrangement employs certain types of symmetry, then at a glance both sides appear to the be same.
Gwen is instead focusing on both sides having identical reversibility. Jay's solution is to accept that both A and B exist, and to come up with patterns where both A and B are relevant and ways to choose between them. Gwen's solution is to think about ways of joining that might look identical from either side of the fabric. A versus B no longer matters. Furthermore, Gwen focused on creating new stitches from selvedge edges in the previous tier, rather than how to join to the live stitches from the previous tier.
Without giving away too much (I hope!) Gwen has three potential solutions. The first involves using the selvedge turning stitch that is so critical in Mondragon loop. The second and third involve using the encased pick up Gwen teaches in her “No Wrong Side – Reversible Fabrics” class.
The homework for the class was to make three left-leaning base triangles on a magic number of 7. Gwen didn't provide the directions to how to do that. If you can't do the homework, you probably aren't quite ready to take the class. Truth be told, I'm used to doing entrelac square rather than en pointe, so I had to look up how to work base triangles. In my swatch, the grey triangles are the homework.
The green course and grey triangles demonstrate the three pick-up methods Gwen taught. Those are the ones I worked in class. From left to right, using the turning stitch (similar to Jay Petersen's method), solid encasement, and lace encasement. These were worked from the reverse side of the fabric, so in the photograph above, you are seeing what they look like from the opposite side. In all three cases, Gwen had us join to the live stitches by working two stitches together.
Given a few weeks' time, I realized I needed to get back to this swatch and finish it so I could liberate the needle and class yarn. But I also got thinking about potential variations. Since I wanted to work one more plain course of rectangles before working top triangles, I had a chance for more experimentation on the purple tier. I was especially interested in if I could match where the selvedge joins live stitches to where stitches are initially picked up.
The first option I tried was a variation on the lace encasement. Gwen's version is a bit more delicate because she skips unneeded stitches. I decided to try it using the turning stitches but working them together in pairs. The join is a bit thicker, although it still has the decorative gaps. The advantage is I could match this pick up method to the live stitch join.
All three experiments produced joins with different visual characteristics. But I also feel they all produced pick ups and joins that generally matched.
I did try one more experiment on the blue course. At the center purple block, I ended the row with (k1, yo)×7 instead of k7. I wanted to see if I could somehow sandwich the blue yarn. I eventually tried:
Overall, an interesting set of experiments. As with so many things in knitting, the optimal solution is predicated on artistic goals.
Some of you may be wondering why I would take this class. After all, I've already posted the Sir Thomas scarf, which is a reversible entrelac project. But Gwen's approach is different from Jay Petersen's. Always good to survey the range of technique.
You'll recall in entrelac you are joining little blocks as you go. These blocks join in two places. When you start a new block, you work up stitches off the side of a block in the previous tier. That is one place to think about reversibility. As you work back and forth on the new block, you also join one selvedge edge to live stitches from a block in the previous tier. That's the second place to think about reversibility.
You'll recall from my previous posts that Jay Petersen's method primarily involves thinking about the selvedge edge joins. Jay has done a lot of experimenting with knit, purl, and cable patterns. When he creates new stitches from the selvedge of the previous tier, he thinks about whether knit stitches or purl stitches will blend, and he uses the turning loops as if they were live stitches. When he joins the selvedge of his new block to the live stitches of the previous tier, he does so using Rick Mondragon's intarsia sliding loop technique. But again, that technique mimics knit or purl stitches. So Jay again thinks about which ones will blend.
This comes back to the question, what kind of reversibility? Jay has focused on the kind of reversibility found in knit-purl patterns, such as seed stitch. If there is a knit on the "front," there is a purl on the "back." Depending on the symmetry, these patterns can look essentially identical from either side (the pattern is merely shifted or mirrored), or they can be different but related. (The pentagonal entrelac cushion cover is an example of this type of reversibility.) This is similar to the reversibility of basic two-color double-knitting. The sides are positive-negative mirrors of each other. If there are equal numbers of knits and purls, and especially if the arrangement employs certain types of symmetry, then at a glance both sides appear to the be same.
Gwen is instead focusing on both sides having identical reversibility. Jay's solution is to accept that both A and B exist, and to come up with patterns where both A and B are relevant and ways to choose between them. Gwen's solution is to think about ways of joining that might look identical from either side of the fabric. A versus B no longer matters. Furthermore, Gwen focused on creating new stitches from selvedge edges in the previous tier, rather than how to join to the live stitches from the previous tier.
Without giving away too much (I hope!) Gwen has three potential solutions. The first involves using the selvedge turning stitch that is so critical in Mondragon loop. The second and third involve using the encased pick up Gwen teaches in her “No Wrong Side – Reversible Fabrics” class.
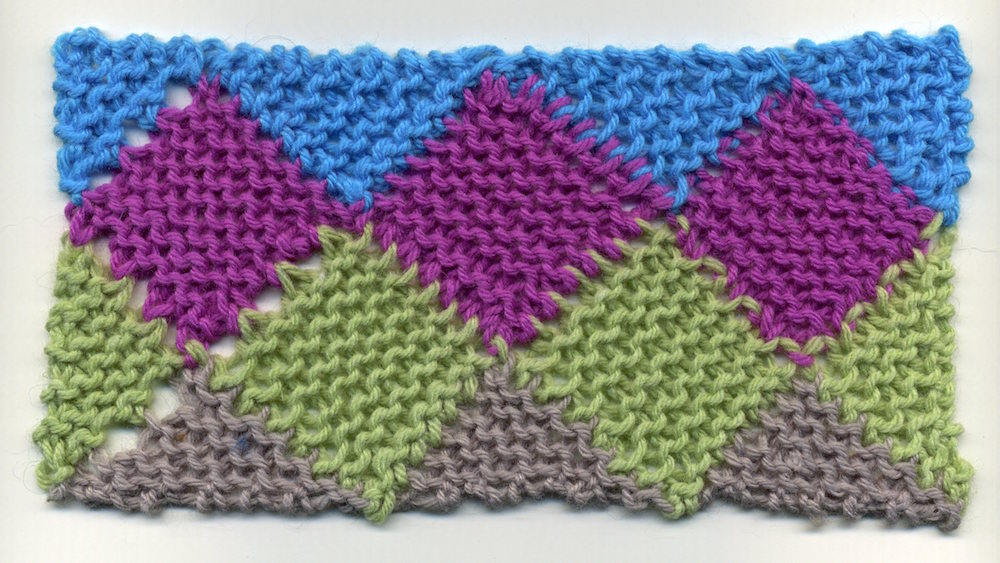
The homework for the class was to make three left-leaning base triangles on a magic number of 7. Gwen didn't provide the directions to how to do that. If you can't do the homework, you probably aren't quite ready to take the class. Truth be told, I'm used to doing entrelac square rather than en pointe, so I had to look up how to work base triangles. In my swatch, the grey triangles are the homework.
 |
| Reversible entrelac obverse |
The green course and grey triangles demonstrate the three pick-up methods Gwen taught. Those are the ones I worked in class. From left to right, using the turning stitch (similar to Jay Petersen's method), solid encasement, and lace encasement. These were worked from the reverse side of the fabric, so in the photograph above, you are seeing what they look like from the opposite side. In all three cases, Gwen had us join to the live stitches by working two stitches together.
Given a few weeks' time, I realized I needed to get back to this swatch and finish it so I could liberate the needle and class yarn. But I also got thinking about potential variations. Since I wanted to work one more plain course of rectangles before working top triangles, I had a chance for more experimentation on the purple tier. I was especially interested in if I could match where the selvedge joins live stitches to where stitches are initially picked up.
 |
| Reversible entrelac reverse |
The first option I tried was a variation on the lace encasement. Gwen's version is a bit more delicate because she skips unneeded stitches. I decided to try it using the turning stitches but working them together in pairs. The join is a bit thicker, although it still has the decorative gaps. The advantage is I could match this pick up method to the live stitch join.
- Work all the stitches towards the join. Turn.
- Place working yarn where you need it to be for the next stitch.
- Slip a stitch purlwise to the right needle.
- Using the left needle tip, pass the two live stitches from the previous tier over the live stitch on the current tier.
- Slip the live stitch back to the left needle.
- Work the row.
- Exception: On the very first row, I only passed one stitch over instead of two.
- I put the seven turning stitches on a needle.
- Work alternating knit 1 wrapping yarn counter clockwise (the way opposite from how most people in the West are taught), reverse yarn over 1, across all seven stitches. 14 stitches/7 pairs total. Turn.
- With yarn where you need it for the next stitch, slip the first pair to the right needle.
- Pass the live stitch from the previous course over both the stitch and reverse yarn over.
- Slip the pair back to the left needle.
- As you work the row, work all the pairs together either "knitting through the back of the loop" or purling up through the back of the loop. (If you had wrapped yarn the regular way, you'd need to slip all these stitches knitwise to change their facings. I figured it was easier to give the stitches the facings I wanted at the time I created them.)
- On later rows, use the same maneuver to join, except slip just one stitch instead of a knit-revyo pair.
- Work k1, p1, k1, p1, k1, p1, k1 across the 7 turning stitches.
- Knit up (or if appropriate, purl up) a Mondragon loop from the live stitch of the previous tier.
- Work back and forth on the loop.
- Repeat as needed.
All three experiments produced joins with different visual characteristics. But I also feel they all produced pick ups and joins that generally matched.
I did try one more experiment on the blue course. At the center purple block, I ended the row with (k1, yo)×7 instead of k7. I wanted to see if I could somehow sandwich the blue yarn. I eventually tried:
- Knit across.
- Purl the yarn over.
- Pass the previous stitch on the right needle over the active stitch on the right needle.
- Reorient the knit stitch on the left needle so that it faces east/right.
- Slip the active stitch on the right needle to the left needle.
- Pass the stitch on the left needle over the active stitch.
- Turn and knit back. (In this special case, there is also a decrease at the end of the row to shape the ending triangle.)
Overall, an interesting set of experiments. As with so many things in knitting, the optimal solution is predicated on artistic goals.
Comments