When making garments that fit the human form, we sometimes talk about "ease." Ease is a measure of how much extra fabric is in a garment. For example, if a bust measurement is 36 inches, then a sweater that is exactly 36 inches around has no ease. If the sweater is 38 inches, it has 2 inches of positive ease at the bust. If the sweater is 35 inches, is has one inch of negative ease. A big, boxy, oversized sweater might have 6 or 8 inches of positive ease.
This is important when you are making garments that both fit and flatter. And ease behaves differently if the fabric is woven than if it is knitted. Woven fabrics generally don't stretch if they have been cut with the grain. (Cutting on the bias is a whole different story.) Knit fabrics are different. They stretch. They move. They might even grow.
This also means knit fabrics can match our shape. If the shape you have underneath is not one you want to display to the world, then this is maybe a bug rather than a feature. On the other hand, this can be advantageous. I recently made a simply shell using Takhi Yarns Ripple. Ripple is a thick and thin cotton yarn with no elasticity in spite of its i-cord construction. After a great deal of swatching through stockinette, reverse stockinette, garter, ribbing, seed stitch, and the like, I decided to work the garment in stockinette brioche stitch (Nancy Marchant's term) or column pattern (Elise Duvekot's term). Although brioche is a somewhat slow knitting technique, it gave me two advantages. First, brioche is very stretchy. The resulting fabric is stretchy in spite of the yarn. Second, brioche is a more solid fabric. I tend to wear only a thin silk slip as an undergarment, so I wanted a top that wasn't too sheer.
The pattern was relatively simple.
Make a gauge swatch in the desired stretchy stitch pattern and write down the math.

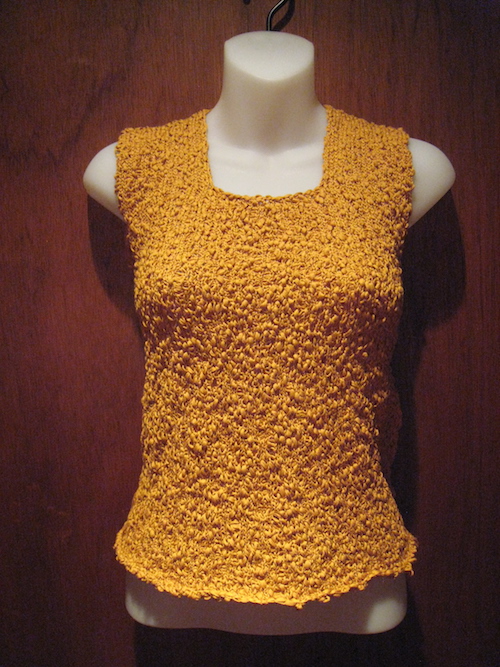
Notice there is no shaping anywhere in this garment. It is rectilinear, as if it had been constructed from Lego building bricks. Off the body, it is nothing special.
But on a body, it sings!
Now this top does not look *quite* this good on me, unless I wear a Frederick's water bra underneath. I'm small-breasted, but I know I can use foundation garments to give me more shape. Notice the key to making it flattering is the placement of ease. Negative ease stretches over the breasts and emphasizes that shapeliness. If you are sewing, this effect is difficult to achieve with woven fabric. But with knit fabrics, we can achieve this result without even increasing and decreasing!
The bottom line: when we knit, knit for the intended body. Allowing the knit fabric to stretch just a little over a feature will emphasize it by making it look a little more shapely and a little larger. Giving the knit fabric just a little positive ease so that it skims a less-delightful feature will disguise it without making it look like you are trying to hide something under a circus tent. And while there are lots of tutorials out there to help you shape garments using increases and decreases, sometimes a wise choice of ease and stitch pattern is all you need to make a flattering garment.
This is important when you are making garments that both fit and flatter. And ease behaves differently if the fabric is woven than if it is knitted. Woven fabrics generally don't stretch if they have been cut with the grain. (Cutting on the bias is a whole different story.) Knit fabrics are different. They stretch. They move. They might even grow.
This also means knit fabrics can match our shape. If the shape you have underneath is not one you want to display to the world, then this is maybe a bug rather than a feature. On the other hand, this can be advantageous. I recently made a simply shell using Takhi Yarns Ripple. Ripple is a thick and thin cotton yarn with no elasticity in spite of its i-cord construction. After a great deal of swatching through stockinette, reverse stockinette, garter, ribbing, seed stitch, and the like, I decided to work the garment in stockinette brioche stitch (Nancy Marchant's term) or column pattern (Elise Duvekot's term). Although brioche is a somewhat slow knitting technique, it gave me two advantages. First, brioche is very stretchy. The resulting fabric is stretchy in spite of the yarn. Second, brioche is a more solid fabric. I tend to wear only a thin silk slip as an undergarment, so I wanted a top that wasn't too sheer.
The pattern was relatively simple.
Make a gauge swatch in the desired stretchy stitch pattern and write down the math.
Cast on in the round in an amount that is close to zero ease at the
waist but is slightly negative ease at the bust and that is a multiple
for the chosen stitch pattern.
Work in the round to the
underarms. Be sure the lower hem will hit your body at a point that is
flattering — i.e. either above or below the widest part of your hips.
Park the front stitches
and continue working back and forth up the back to the top of the
shoulder. Work a selvedge treatment at each edge, if desired. Notice the
fabric will end slightly towards the back of the body, so that there is
a straight line across the back of the shoulders and neck.
Park the back stitches.
Join a new skein and work
a couple inches back and forth across the front. Once again, work a
selvedge treatment at each edge, if desired. Notice you can try on the
garment and work until the neckline is a height that looks good on you.
On right-side row, knit across, bind off center stitches, continue knitting across. Bottom of neckline is now bound off.
On wrong side, work across first strap, jump to other strap, join new skein, continue across second strap.
Continue
working back and forth with two skeins to complete the front “straps.”
Notice that the length of the front might be different than the length
of the back depending on what is needed to fit your body. This is fine.
Try on garment to double-check fit.
Turn the work inside out and work three needle bind-off to join the shoulder, bind off the back neck, bind-off second shoulder.
Turn work right-side out. Block if necessary.
Edgings — particularly in crochet — can be added after the fact at the neck, armscyes, and hem.Notice there is no shaping anywhere in this garment. It is rectilinear, as if it had been constructed from Lego building bricks. Off the body, it is nothing special.
But on a body, it sings!
Now this top does not look *quite* this good on me, unless I wear a Frederick's water bra underneath. I'm small-breasted, but I know I can use foundation garments to give me more shape. Notice the key to making it flattering is the placement of ease. Negative ease stretches over the breasts and emphasizes that shapeliness. If you are sewing, this effect is difficult to achieve with woven fabric. But with knit fabrics, we can achieve this result without even increasing and decreasing!
The bottom line: when we knit, knit for the intended body. Allowing the knit fabric to stretch just a little over a feature will emphasize it by making it look a little more shapely and a little larger. Giving the knit fabric just a little positive ease so that it skims a less-delightful feature will disguise it without making it look like you are trying to hide something under a circus tent. And while there are lots of tutorials out there to help you shape garments using increases and decreases, sometimes a wise choice of ease and stitch pattern is all you need to make a flattering garment.
Comments