I find myself finally letting my life drop out of 5th gear overdrive and down into 3rd gear -- getting things done, but not being quite so crazy. Over the last couple weeks I've driven up and back to Columbus, Ohio for Knitters Connection; visited dear friends in Kentucky; toured the Cincinnati Zoo; dealt with my Yahoo! e-mail account getting hacked by a virus; cleaned my house; hosted a game night and a Pathfinder game; combed and prepared several ounces of raw mohair; ran a knitting guild meeting; oiled the patio furniture; baked a batch of scones; and taken cats to the vet.
I had a wonderful time at Knitters Connection. A huge thank you to everyone who took a class with me! I had one crash and burn moment in the Unventions class, but by the end, I also heard several gasps of awesome delight. I was also very pleased by how several people in that class were experimenting and coming up with their own unventions by the end of class. And I was totally shocked to see 14 people in the brioche class. I'll be updating my handout and making more swatches for that class. I'm happy with how that class has evolved from a make a scarf class to an examination of both methods of brioche -- knit below as well as yarn over and slip. I hope students from that class will find they can recognize and work any brioche they encounter.
Just before I left for Ohio I also signed the contract for Southeastern Animal Fiber Fair in October. I'll be teaching When to Combine (combination knitting), Practical Double Knitting, Missing Link (brioche), Oops! Now What Do I Do (mistake fixing), More Than One Way to Skin a Sweater, and Daring Double Cables (true double-knit cables).
I've accomplished very little knitting lately. I did, however, finally take some time to watch Anne Berk's Inside Intarsia dvd. I believe I purchased it at STITCHES South 2011, so it had been sitting on my shelf for quite some time. I purchased it specifically because I wanted to learn how to do circular intarsia. I've done it before in Karen's anime sweater, but I thought Anne might have come up with a better way. My motivation was that I had just completed the double-knit soap sack and I noticed that the links in double knitting are not the same as the links in intarsia. I decided to explore this further by knitting the soap sack again in circular intarsia.
 An "easy" way to think about circular intarsia is to think about closing boxes. Really. Lots of people know the trick to closing boxes that you want to open again later, such as storage boxes for holiday decorations. You overlap the four flaps so that each flap is underneath one flap but on top of another flap. They stay reasonably closed without layers of tape accumulation. The trick is always getting that last flap into place.
In circular intarsia you have a similar problem. Each link involves an overlap, but the first and the last aren't where you need them to be. You have to think ahead and move the last strand into place, then work around. Anne Berk's video was somewhat helpful, although I found that the camera didn't always give me the angle I needed to see exactly what she was doing. Probably the most useful statement she made was that you knit around until you can't make links anymore, then you turn and purl back until you can't make links anymore.
An "easy" way to think about circular intarsia is to think about closing boxes. Really. Lots of people know the trick to closing boxes that you want to open again later, such as storage boxes for holiday decorations. You overlap the four flaps so that each flap is underneath one flap but on top of another flap. They stay reasonably closed without layers of tape accumulation. The trick is always getting that last flap into place.
In circular intarsia you have a similar problem. Each link involves an overlap, but the first and the last aren't where you need them to be. You have to think ahead and move the last strand into place, then work around. Anne Berk's video was somewhat helpful, although I found that the camera didn't always give me the angle I needed to see exactly what she was doing. Probably the most useful statement she made was that you knit around until you can't make links anymore, then you turn and purl back until you can't make links anymore.
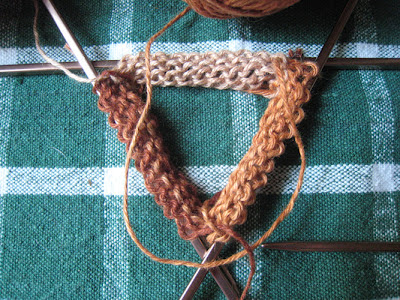
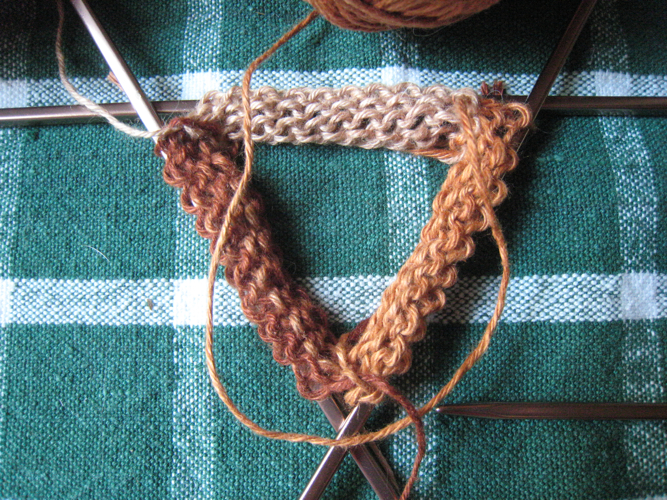
Here are a few photographs to help explain how to work intarsia in the round. Surprisingly, it really isn't as difficult as you might imagine!
 Here I've cast on ten stitches in each of three shade of brown. I've arranged them on double-pointed needles, and I've worked a few rounds of circular intarsia. Since the stockinette fabric curls, this photograph mostly shows the wrong side of the work.
 Notice that each strand is at a different corner of the work. This is how everything looks at the beginning and end of each round.
 To begin the round, I've moved the copper yarn across its row and around the dark brown. I haven't knit the copper yarn. That will be the last knitting of the round. But I have put the copper yarn in the proper location to form a link with the dark brown yarn. Notice that the copper yarn wraps from right side to wrong side around the dark brown. When I do this, I think about where I want the copper yarn to be when I work it later. I'm placing it along that path, I'm just not working it yet.
 Next I knit. I started with the dark brown and knit across. When I reached the light brown, I worked the normal intarsia link. In the picture, you can see the dark brown strand carried toward the upper left across my finger. Notice the new color -- light beige -- comes around behind and to the right of the old. Also, notice how that new color is going to trap not one but two strands of the old color.
 I continued to knit the round with the light beige. At the end of the beige section, I reached the copper section.
 Remember the copper yarn was already trapped by the dark brown at the beginning of the round. I wrapped the beige from right side to wrong side and ducked it through the copper loop I formed at the beginning of the round. This forms the exact same type of link as the one I made with the dark brown and the beige. Then I just knit across that final copper section and pulled the leftover loop yarn all the way through after the last stitch of the round. For the wrong side, you'd be purling instead of knitting, but the basic idea is the same -- trap the final yarn with the first, work around, link the next to last yarn with the loop formed by the final yarn, finish working across with the final yarn, and evaporate the excess loop.
I had a wonderful time at Knitters Connection. A huge thank you to everyone who took a class with me! I had one crash and burn moment in the Unventions class, but by the end, I also heard several gasps of awesome delight. I was also very pleased by how several people in that class were experimenting and coming up with their own unventions by the end of class. And I was totally shocked to see 14 people in the brioche class. I'll be updating my handout and making more swatches for that class. I'm happy with how that class has evolved from a make a scarf class to an examination of both methods of brioche -- knit below as well as yarn over and slip. I hope students from that class will find they can recognize and work any brioche they encounter.
Just before I left for Ohio I also signed the contract for Southeastern Animal Fiber Fair in October. I'll be teaching When to Combine (combination knitting), Practical Double Knitting, Missing Link (brioche), Oops! Now What Do I Do (mistake fixing), More Than One Way to Skin a Sweater, and Daring Double Cables (true double-knit cables).
 |
| Circular intarsia soap sack. Compare to double-knit version here. |
 |
| double-knit on left, intarsia on right |

Here are a few photographs to help explain how to work intarsia in the round. Surprisingly, it really isn't as difficult as you might imagine!


Comments